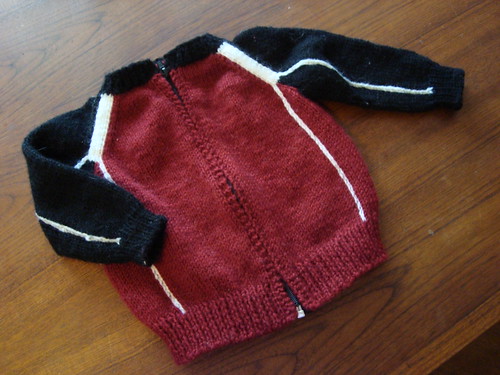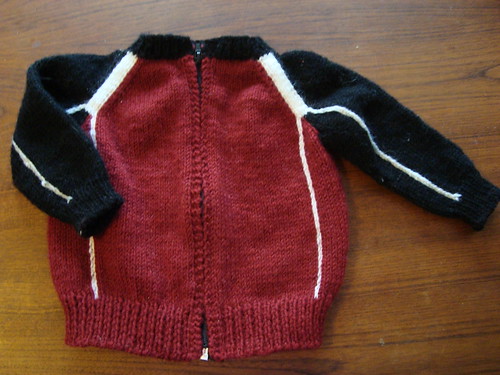
In the time honored tradition of procrastinating doing something you don't want to do (embroider) by doing something you have been putting off, I finished up the baby sweater for Teddy's fencing teacher this morning.
Teddy's jacket is a raglan, zippered, color blocked, piped, warm up team jacket. The body is a marroon, sleeves are black, with white along the raglan lines one the sleeves, with piping along what would be the princess seam lines in a woman's dress, and matching piping on the sleeves.
One of Teddy's coaches, Ariana, had a baby back in December. One day, while idly looking at Teddy, which, of course, means looking at that jacket, since if he's awake, he's wearing it, I realized it was a raglan, and that it would be easy to copy as a baby sweater...so who could resist that? Off to the yarn store for Plymoth Encore yarn. I wanted DK, and I would enlarge mom's baby sweater pattern a bit. Since the shop I went to didn't have DK Encore, I got the worsted, and thought I'd kluge it. Then I talked to my Mom. Always a good idea, since she told me she'd made that sweater in worsted, and it turned out to be a 12 mos size, you only have to lengthen the pattern, not change it otherwise.
There were, of course, challenges. The pattern is top down, made in one piece. So after the black neck, I had to have the maroon front, a bit of white, then black, then white, then the maroon back, then white, black, white, and the other maroon front!
If I worked consistently in one place, picking up and putting down the work carefully, there were no tangles, since this was intarsia. But if I put it in my work bag, and brought it anywhere, then I had to guess at which way was up, and if I had to turn it the other way first. I never did manage to really figure out what it looked like with only one twist, to turn it the right way around. I kept thinking that that should be simple to figure out, but I didn't manage to do that. So I had to untangle it every so often.
It got easier once I dropped the sleeve stitches, since I only had the body maroon and the 4 piping lines. Each line of piping was just a single 2-yard-long strand, that I could pull out as I worked it. No tangles there. They slowed down the rows a smidge, but were easy enough to work. Doing the sleeves was the same, each sleeve had two piping strands, but where easy to work...they just took forever! I tried to work the sleeves with a magic loop, but it kept making me nuts. Of course, since I was working with my acrylic circular tips, I couldn't use two circs, because I only had one pair of them, and I know that if I used wood or metal tips for the second circ, I'd have strange lines, because I really knit differently with the different needles. I finally remembered that I could use the right tip as a acrylic, and the left one as a smaller needle, and it would work out. So I put together two needles like that, and that worked. It would have been even more clever to remember I'd done that, so that I would have remembered that I did, indeed, have the necessary tips to work the ribbing when I was at the parade, rather than have to wait to get home to finish the sleeve! But I got a lot of Abe's hat done then.
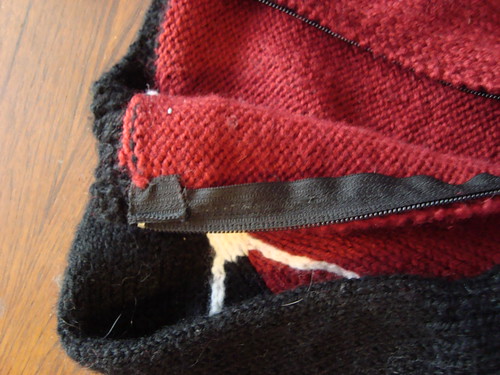
To install the zipper, I made a black chain and whipped it along the zipper tape with regular thread. I started at the bottom, having woven in the tail into the back of the chain. I carefully stitched the bottom of the chain to the hard bit of the zipper tape, very securely, since the bottom and the top tend to have the most stress. I wipped the chain to the tape with about two sts per chain, along the zipper side of the chain, lining it up with the lines on the tape. I make sure to not twist the chain and to make sure it was not at all stretched, so that the zipper tape would stay flat. I made sure to sew from the bottom on both tapes, although one is more awkard than the other. At the top, I undid the tail, and frogged it back to just the right length, then ended it and wove the tail in, and then stitched the top securely. I folded the top flaps back, and stitched them down, but you have to keep the inner edge far away from the zipper teeth, or it won't zip smoothly.
To sew the zipper in, I matched the top and bottom and used those clippy barrettes to hold it in place.

I picked a line of sts on the inside, and followed up, stitching in maroon from the black chain to the jacket insides.

Mostly I stitched under every other row on the inside, but occasionally did a few more stitches than that. I had to follow a column one stitch further out at the ribbing, to get it to match the top. I'm not exactly sure why, but that made it even, so it worked. Of course, I had to do the second tab a second time, to make the two zippers match more closely at the neck, but it worked. The garter stitch on the jacket's left side appears to be a tad smaller than on the right but I think that is because of how I stitched it. I used the same vertical row on each side, but there must be something about my tension that was off. I (briefly) considered worrying about it, but decided I was sick of the jacket and that I didn't care. I know a few people who would notice it, but, well, as Elaine says, "Done is better than Perfect."

I did use sewing thread to tack down the zipper tape at the neck, and make the tops match perfectly....it was easier than redoing it about 100 times with the yarn, and only took a couple of minutes.

I love it.


2 comments:
That craftsmanship is superb. You should be proud!
that is really, really cute. I love it too!
Post a Comment