Score. (running totals)
Plague Colleen
Wed. 1 0
Thurs 2 0
Fri. 3 0
Sat. 4 0
Sun. 5 0
Mon. 25 0. (plague cheated)
Tues. 28 0
Wed. 28 5
Thurs. 28 28
We are into the tie breaker game....clearly, 6 hours of actual sleep gets Colleen a lot of points.
Thursday, December 6, 2012
Monday, October 1, 2012
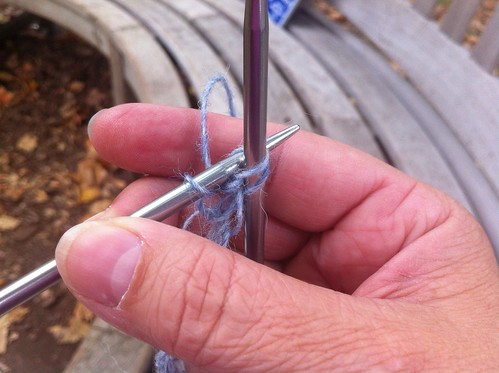
Join, being careful not to twist
People are always asking how to fix a twist, after they are a few rows into a project...and often call it a moebius (it is not). I once hear a suggestion of using pins or clips to pull e edge into the middle, while the work was laid flat on a table. I've been suggesting that ever since, but last week I improved upon it!
I was making my second Woobie stuffie/blankie, and I remembered from last time how frustrating casting on that many stitches was. I had the hardest time getting the number right, then making sure there was no twist. It just took forever. This time, I had a clever idea. First, I put a marker every fifty stitches, triple checking the numbers between markers (I still managed to mess that up, but wht can you do?). Then I put a safety pin every 6 inches or so into the very edge of the cast on edge...into the knotty bits under the cast on. (I cast on in long tail with waste yarn, to be clipped off, later, as a provisional cast on). Then, before joining, I threaded a bit of waste yarn though each safety pin, and pulled them all to the Center and tied it into a circle, making sure that the work was untwisted. This made it all much easier to see if the work was trying to twist!
It still looked twisted around the needle, until I got a few inches done, but once I had made sure that there were no twists, the inner circle wouldn't let the sts twist all the way around. It worked great!
Saturday, August 25, 2012
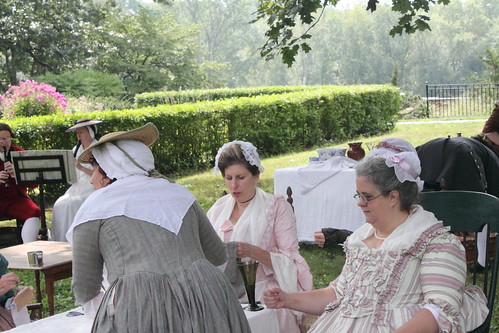
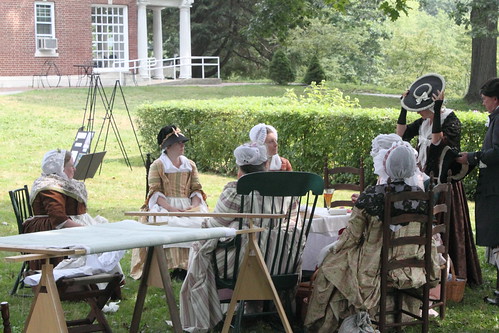
Garden Party
It was a good party....
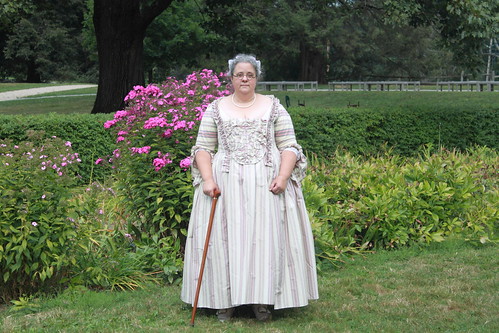
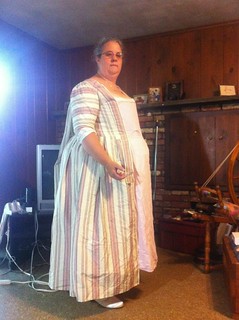
The gown was DONE. Totally done. Not just wearable, but, rather, DONE!


and for once, I wasn't portraying the "world's worst servant"!
The gown was DONE. Totally done. Not just wearable, but, rather, DONE!
and for once, I wasn't portraying the "world's worst servant"!
Friday, August 24, 2012
Gown Documentation
My gown is a sacque back, and it has an open front with robings and a stomacher. It can be challenging to copy a painting, since you can seldom see all the details from the front and back. Mrs. Goldthwait, in Copley's painting, is a rich source of information. She is wearing a brown satin gown with sleeve ruffles, ruching and a decorated stomacher is barely seen, but she is turned sideways enough to tell that her gown has the flowing pleats of a sacque back. Mercy Otis Warren, in another of Copley's paintings, wears a blue satin gown, with much ruching and decorations on the stomacher. It is a bit earlier, and the gown may be a studio piece, as there are other paintings that seem to use the same gown. This gown has many of the same details as the gowns in the Kyoto, Revolutions of Fashion, exhibit book.
I used a gown from Kyoto, p. 42 for the meandering pattern of ruching on the stomacher. I used the back views of the 3 sacques pictured on p. 52 to work out how to do the pleats and sleeve tops. Good close ups really help, when you haven't got extant artifacts at home to examine! I also used the schematic from Baumgarten's Costume Close Up for the construction, as well as Janet Arnold's Patterns' of Fashion for the sleeve ruffle shape (thanks, Sue Felshin, for lending me the pattern you made from the diagram in the book!).
I used a gown from Kyoto, p. 42 for the meandering pattern of ruching on the stomacher. I used the back views of the 3 sacques pictured on p. 52 to work out how to do the pleats and sleeve tops. Good close ups really help, when you haven't got extant artifacts at home to examine! I also used the schematic from Baumgarten's Costume Close Up for the construction, as well as Janet Arnold's Patterns' of Fashion for the sleeve ruffle shape (thanks, Sue Felshin, for lending me the pattern you made from the diagram in the book!).
Thursday, August 23, 2012
A Sacque
My gown is coming along. I am doing the stomacher now, then the sleeve ruffles and ruching down the side front opening.
I just love the backs on a sacque!
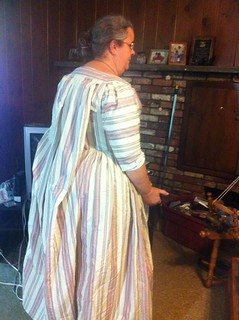
Here is a gown in Kyoto that is similar to the way I want to trim this, but I'm just using ruching, not lace.
Mrs Otis also wore this basic style in the John Singleton Copley painting, but it might be a "studio gown", a gown owned by the artist, that he painted a other women in.

http://www.mfa.org/collections/object/mrs-james-warren-mercy-otis--32409
I just love the backs on a sacque!
Here is a gown in Kyoto that is similar to the way I want to trim this, but I'm just using ruching, not lace.
Mrs Otis also wore this basic style in the John Singleton Copley painting, but it might be a "studio gown", a gown owned by the artist, that he painted a other women in.
http://www.mfa.org/collections/object/mrs-james-warren-mercy-otis--32409
Friday, August 17, 2012
Challenge Spectacles
It is more of a challenge to document a woman wearing glasses in the 18th C. It appears that most women having their portraits paintings were vain enough to not wear their glasses, if they had them. It's pretty hard to tell if they used glasses at all!
There are a few paintings depicting women in glasses, though.
Here is the Countess of Stolberg-Gedern, by Lippol. Not American, but well off. And not the kind of glasses that seem to be most common.
This is Madame Crozat, Aved, holding her glasses. But, it's French, 1741 So, not so great.
Here is a servant woman, in glasses, in High Life Below Stairs, by Collet, 1763. Closer, it's England, but a servant woman, not a well off American in silk.
This woman seems to be an artist, painting herself, Anna Dorothea Therbusch, in 1777, but it doesn't seem to be English.
My Daughter Anne, by Walpole, is a satire, I think, 1779. It shows a neatly dressed mother, horrified by her daughter, and the mother is wearing glasses. Now, this could be to show how dowdy mom is compared to her over-the-top dressing daughter, but in order to suggest that glasses make a woman dowdy, that means that some must have worn them, and put up with the dowdiness. That is fine with me, I need the glasses and will put up with being dowdy! The woman in them is in a very nice, likely silk short clock with trim, so I think she works for me!
Martha Saunders Salisbury,by Gullageris a bit late, 1789, but shows a terrific woman in silk with glasses. But it doesn't really help document them for me, in 1775.
And, for what the spectacles should look like in 1775, Here is Ben Franklin in his.
Also, from the Museum of Vision, Spectacles like the originals I found on ebay. Also, From the American Optometric Association, they have a pair from 1780 just like mine. I had my local independent optician put my bifocal script into these frames. He had to remove the rivets, as undoing the screws didn't allow the lenses to be removed. We have temporarily replaced those rivets with new screws, and, if we discover a safe way to add rivets, we will change them. The loops originally had been wrapped with a dark silk or linen ribbon (I think silk). It was disgusting, and since I'm wearing these, I removed it! Then I cleaned the glasses up to have the lenses installed. They work quite well, but we need to gently adjust them, as they hurt one ear.
edited to add my thanks to Karen Larsdatter, having found many of these sources through the links on her page on spectacles.
Documenting the Challenge
I am working on a new Sacque for The Challenge Event, at Minuteman Park. What we need to do is document all our clothing for this event. It's not all that hard, if one is careful with fabric choices....I am using this fabric:

I don't remember where I got it.It's a "barred silk", it has little skinny cross bars, in addition to the stripes. Correction: Mine is a ribbed silk, not barred. The lines are white, they are just the weft.
There are similar fabrics in Revolution in Fashion 1715-1815, p.38 has the closest. Here is a detail of the fabric in the book. (If you haven't got this book, you need to see it! It's terrific!)

Pretty similar, hmmm? Not perfect, but it's next to impossible to get a dead ringer in modern fabric.
My gown is almost a gown in shape, but needs its sleeves sewn on, front skirts, robings and a ton of trimming!
I don't remember where I got it.
There are similar fabrics in Revolution in Fashion 1715-1815, p.38 has the closest. Here is a detail of the fabric in the book. (If you haven't got this book, you need to see it! It's terrific!)
Pretty similar, hmmm? Not perfect, but it's next to impossible to get a dead ringer in modern fabric.
My gown is almost a gown in shape, but needs its sleeves sewn on, front skirts, robings and a ton of trimming!
Monday, August 6, 2012
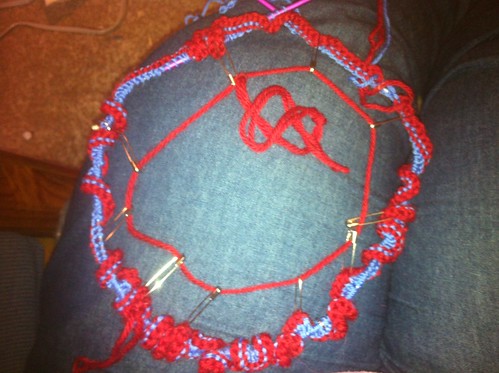
Bridget's Faggotting Cast On
Bridget (Ravelry link) has taught this lace cast on to me several times, and this time, it stuck! It's brilliant....it's lacey, pretty, stretchy, and has enough "oomph" to hold the edge! It isn't flipping up, as a garter edge can.
The way it was taught to me was:
Cast on 2 sts provisionally.
Yo, p2tog turn
Repeat this row ad infinitem.
When you have the number of loops required, minus 4, it's time to pick up sts. Counting the two sts on the needle, pick up a stitch through each loop along the side of the long skinny strip. Be careful you don't twist it! When you get to the end, you should have the number required, minus 2. Pick up the two provisional sts. Done and ready! It's elegant, isn't it? Well, this constant turning made me want to poke my own eyes out....so I knit back and forth as follows.

 and k2tog tbl by inserting the left needle into the backs of the sts on the right needle. Wrap clockwise, as usual.
Repeat these two rows.
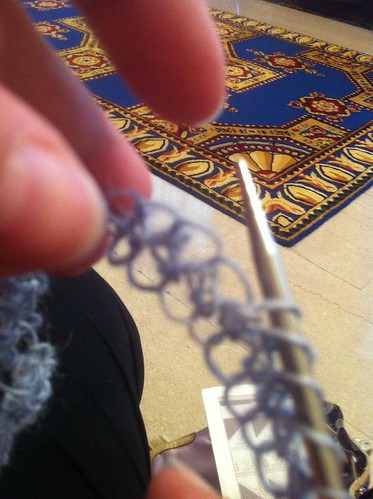
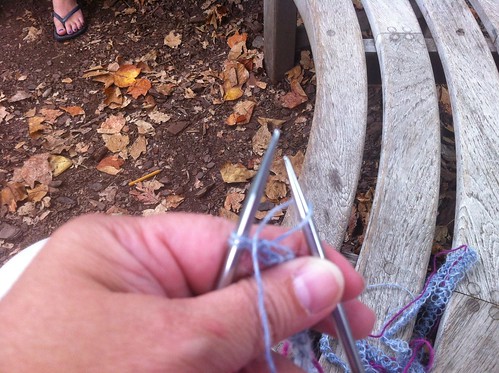
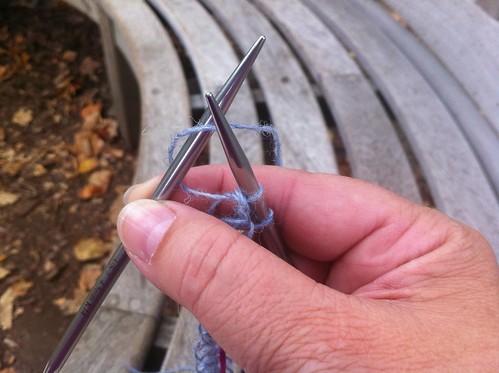
Here I am just putting all the loops onto the right needle. They are large enough it's easiest for me to put them all on the needle, then knit them off, as the last step in the cast on. The cast on isn't complete until the loops all have working yarn stitches pulled through them. In this photo, I picked up the sts with the leading leg behind the needle, because it was easier. I knit them off for the cast on row through the back loop. You can pick them up with the leading leg forward, and knit them standardly, if you prefer. Just avoid twisting them!
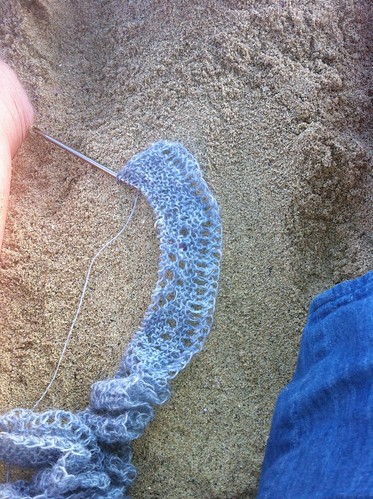
And here is my lace in progress, shot on location, at Santa Monica Beach, waiting for my 17yr old son's arrival there, from a coast to coast bike ride.
And the Boy's arrival....happy, tired, and filthy, after 6 straight weeks of riding his bike 80-115 miles a day, with about 40 pounds of gear!

Yes, I'm very proud of him, and I was so worried during this trip! But Overland Summers did a great job running the trip, as usual.
The way it was taught to me was:
Cast on 2 sts provisionally.
Yo, p2tog turn
Repeat this row ad infinitem.
When you have the number of loops required, minus 4, it's time to pick up sts. Counting the two sts on the needle, pick up a stitch through each loop along the side of the long skinny strip. Be careful you don't twist it! When you get to the end, you should have the number required, minus 2. Pick up the two provisional sts. Done and ready! It's elegant, isn't it? Well, this constant turning made me want to poke my own eyes out....so I knit back and forth as follows.
Co 2
Yo p2tog. Do not turn
yo k2tog tbl "lefty" style as follows: k2tog tbl by inserting the left needle into the backs of the sts on the right needle. Wrap clockwise, as usual.
Yo p2tog. Do not turn
Yo
P2tog
yo k2tog tbl "lefty" style
Wrap the yarn around the left needle
Repeat these two rows.
Picking up the stitches
Here I am just putting all the loops onto the right needle. They are large enough it's easiest for me to put them all on the needle, then knit them off, as the last step in the cast on. The cast on isn't complete until the loops all have working yarn stitches pulled through them. In this photo, I picked up the sts with the leading leg behind the needle, because it was easier. I knit them off for the cast on row through the back loop. You can pick them up with the leading leg forward, and knit them standardly, if you prefer. Just avoid twisting them!
And here is my lace in progress, shot on location, at Santa Monica Beach, waiting for my 17yr old son's arrival there, from a coast to coast bike ride.
And the Boy's arrival....happy, tired, and filthy, after 6 straight weeks of riding his bike 80-115 miles a day, with about 40 pounds of gear!
Yes, I'm very proud of him, and I was so worried during this trip! But Overland Summers did a great job running the trip, as usual.
Tuesday, February 21, 2012
I'm making crazy TsockTsarina socks....and I'm knitting a moebius cowl out of my own handspun, and I'm making new stays, and I'm trying to learn to spin more efficiently.
Pretty much all at once.
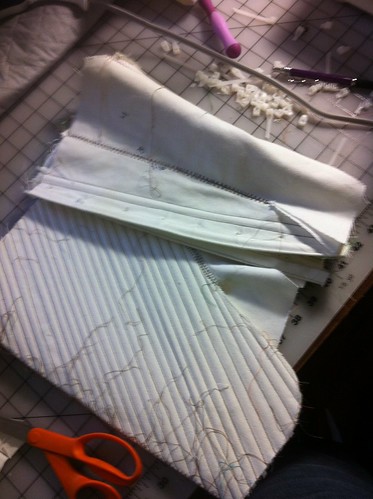
So, here are the mock up stays: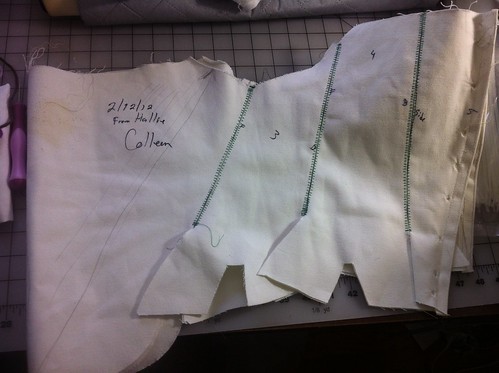
They have been cut out in their entirety, twice, then version 2 had a partial recut, then several tweaks, so it took 2.75 versions to get a pattern worthy of making up! So, now my fabrics are cut, new, heavy duty zipties purchased, and the next step is to make swatches to decide on the best channel width for these zip ties. The best boning, currently, seems to be hand pounded ash which is 1) expensive and 2) hard to get. SO, since we aren't sure that these stays will work well (we are hopeful, though) and aren't sure that I won't need new ones in a year, anyway (hopeful about that, too!), zip ties are a good, interim choice. Once I decide on a pattern likely to last 5 years, I will get the good stuff and make them completely by hand, channels and all. This pair, machine channels and everything else by hand.
The new, real, pair are cut out. I have heavy duty (thicker, wider, longer) zip ties that need testing, so I will stitch some sample channels, to find out the right channel width, and then I can start sewing my new stays!!!
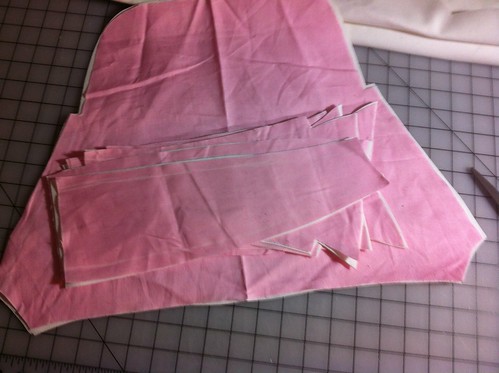
Yes, they are going to be pink!
Pretty much all at once.
So, here are the mock up stays:
They have been cut out in their entirety, twice, then version 2 had a partial recut, then several tweaks, so it took 2.75 versions to get a pattern worthy of making up! So, now my fabrics are cut, new, heavy duty zipties purchased, and the next step is to make swatches to decide on the best channel width for these zip ties. The best boning, currently, seems to be hand pounded ash which is 1) expensive and 2) hard to get. SO, since we aren't sure that these stays will work well (we are hopeful, though) and aren't sure that I won't need new ones in a year, anyway (hopeful about that, too!), zip ties are a good, interim choice. Once I decide on a pattern likely to last 5 years, I will get the good stuff and make them completely by hand, channels and all. This pair, machine channels and everything else by hand.
The new, real, pair are cut out. I have heavy duty (thicker, wider, longer) zip ties that need testing, so I will stitch some sample channels, to find out the right channel width, and then I can start sewing my new stays!!!
Yes, they are going to be pink!
Wednesday, February 8, 2012
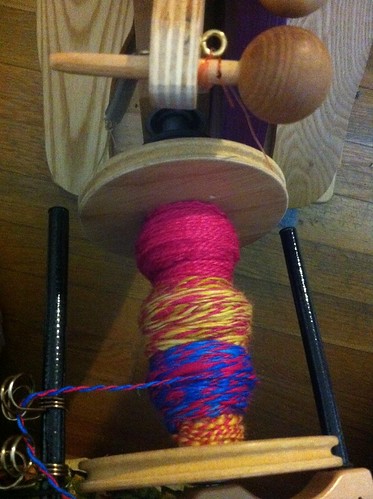
Yarn
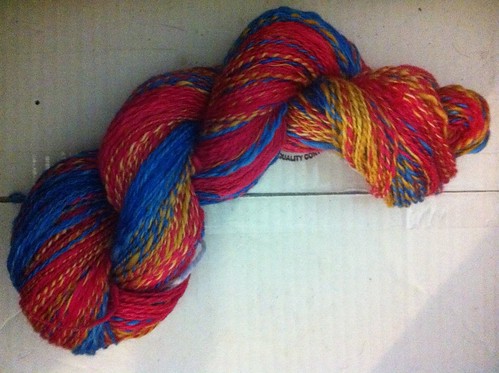
More photos of this yarn before I start winding it...
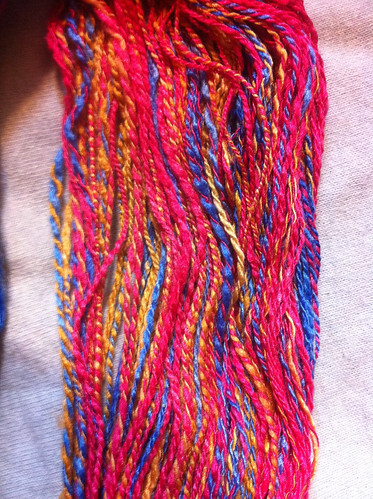
It's amazing, to me, how much like yarn this yarn looks like! I mean, really, if I spun it, it shouldn't really be yarn, right? I'm just plain amazed that spinning really does produce yarn!!!
It's amazing, to me, how much like yarn this yarn looks like! I mean, really, if I spun it, it shouldn't really be yarn, right? I'm just plain amazed that spinning really does produce yarn!!!
Monday, February 6, 2012
Spinning spinning spinning
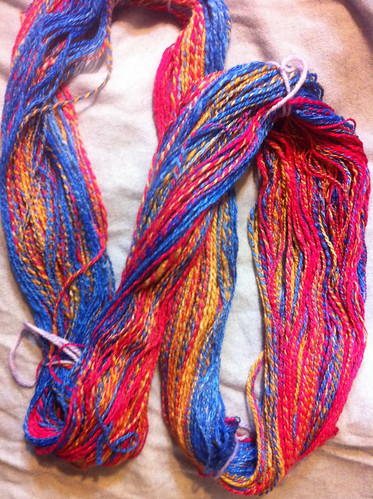
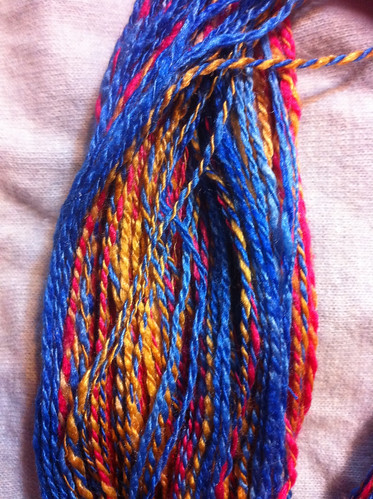
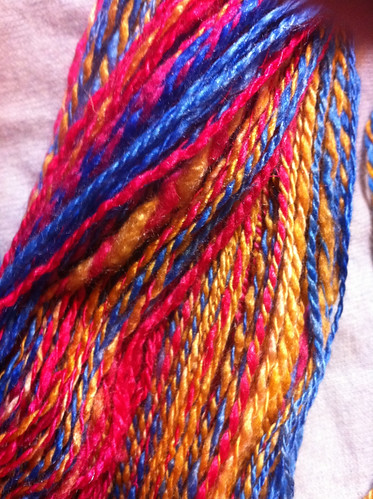
 We had a challenge, at the local spinning guild. One person had been dying (been to a dying workshop, maybe, I think). She brought in a whole bunch of bags, two color ways, one greens and earth tones, the other circus colors. She suggested that everyone each take a bag home, spin it up, and bring it back, and we can compare. I'm just a beginner spinner, but I wanted to play, too!
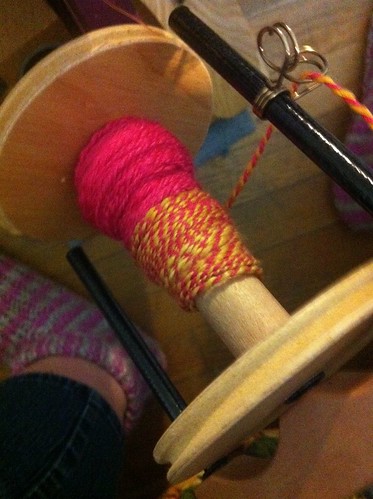
This pink is much closer than the top finished skein's color.
I took a bag of circus colors, I think it was about 4 oz of bright blue, brilliant yellow, and fuchia. After much debate, I decided to use Fractal Spinning. I divided each color in half, and one bobbin got all the blue, then all the yellow, then the pink. The other bobbin used the same sequence, but I divided each color into 4. Hindsight suggests that I should have taken the first bobbin's half and divided it in 4ths, and the second bobbin into 16. Next time!
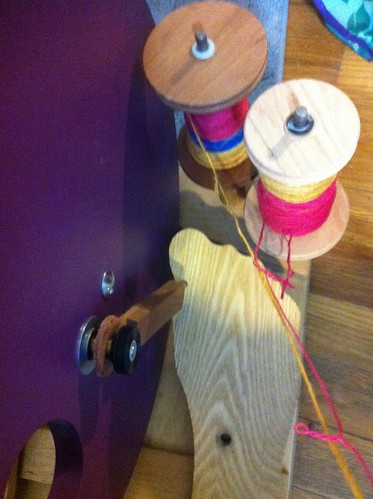
Then I plied them together, starting with both pink ends. I plan on making a simple feather and fan, garter, or modified garter, moebius cowl. I think that the mirroring will show off the colors nicely.

I made yarn!
Subscribe to:
Posts (Atom)

