Saturday, August 25, 2012

Garden Party

It was a good party....
garden party0002

The gown was DONE.  Totally done.   Not just wearable, but, rather, DONE!

garden party0011

garden party0017

and for once, I wasn't portraying the "world's worst servant"!
garden party0015

garden party0010

Friday, August 24, 2012

Gown Documentation

My gown is a sacque back, and it has an open front with robings and a stomacher. It can be challenging to copy a painting, since you can seldom see all the details from the front and back.   Mrs. Goldthwait, in Copley's painting, is a rich source of information.  She is wearing a brown satin gown with sleeve ruffles, ruching and a decorated stomacher is barely seen, but she is turned sideways enough to tell that her gown has the flowing pleats of a sacque back.  Mercy Otis Warren, in another of Copley's paintings, wears a blue satin gown, with much ruching and decorations on the stomacher.   It is a bit earlier, and the gown may be a studio piece, as there are other paintings that seem to use the same gown.  This gown has many of the same details as the gowns in the Kyoto, Revolutions of Fashion, exhibit book.

I used a gown from Kyoto, p. 42 for the meandering pattern of ruching on the stomacher.  I used the back views of the 3 sacques pictured on p. 52 to work out how to do the pleats and sleeve tops.   Good close ups really help, when you haven't got extant artifacts at home to examine!   I also used the schematic from Baumgarten's Costume Close Up for the construction, as well as Janet Arnold's Patterns' of Fashion for the sleeve ruffle shape (thanks, Sue Felshin, for lending me the pattern you made from the diagram in the book!).


Thursday, August 23, 2012

A Sacque

My gown is coming along.   I am doing the stomacher now, then the sleeve ruffles and ruching down the side front opening.

photo

I just love the backs on a sacque!
photo

Here is a gown in Kyoto that is similar to the way I want to trim this, but I'm just using ruching, not lace.

Mrs Otis also wore this basic style in the John Singleton Copley painting, but it might be a "studio gown", a gown owned by the artist, that he painted a other women in.


http://www.mfa.org/collections/object/mrs-james-warren-mercy-otis--32409

Friday, August 17, 2012

Challenge Spectacles

It is more of a challenge to document a woman wearing glasses in the 18th C.   It appears that most women having their portraits paintings were vain enough to not wear their glasses, if they had them.  It's pretty hard to tell if they used glasses at all!

There are a few paintings depicting women in glasses, though.

Here is the Countess of Stolberg-Gedern, by Lippol.  Not American, but well off.   And not the kind of glasses that seem to be most common.
This is Madame Crozat, Aved, holding her glasses.  But, it's French, 1741   So, not so great.
Here is a servant woman, in glasses, in High Life Below Stairs, by Collet, 1763.  Closer, it's England, but a servant woman, not a well off American in silk.
This woman seems to be an artist, painting herself, Anna Dorothea Therbusch, in 1777, but it doesn't seem to be English.
My Daughter Anne, by Walpole, is a satire, I think, 1779. It shows a neatly dressed mother, horrified by her daughter, and the mother is wearing glasses.  Now, this could be to show how dowdy mom is compared to her over-the-top dressing daughter, but in order to suggest that glasses make a woman dowdy, that means that some must have worn them, and put up with the dowdiness.  That is fine with me, I need the glasses and will put up with being dowdy! The woman in them is in a very nice, likely silk short clock with trim, so I think she works for me!
Martha Saunders Salisbury,by Gullageris a bit late, 1789, but shows a terrific woman in silk with glasses.  But it doesn't really help document them for me, in 1775.

And, for what the spectacles should look like in 1775, Here is Ben Franklin in his.

Also, from the Museum of Vision, Spectacles like the originals I found on ebay.  Also, From the 
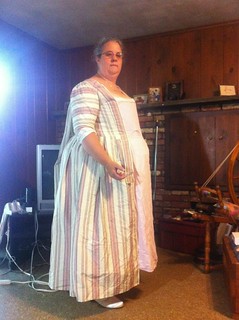
American Optometric Association, they have a pair from 1780 just like mine.  I had my local independent optician put my bifocal script into these frames.   He had to remove the rivets, as undoing the screws didn't allow the lenses to be removed.   We have temporarily replaced those rivets with new screws, and, if we discover a safe way to add rivets, we will change them.  The loops originally had been wrapped with a dark silk or linen ribbon (I think silk).  It was disgusting, and since I'm wearing these, I removed it!   Then I cleaned the glasses up to have the lenses installed.  They work quite well, but we need to gently adjust them, as they hurt one ear.

edited to add my thanks to Karen Larsdatter, having found many of these sources through the links on her page on spectacles.

Documenting the Challenge

I am working on a new Sacque for The Challenge Event, at Minuteman Park.   What we need to do is document all our clothing for this event.  It's not all that hard, if one is careful with fabric choices....I am using this fabric:
photo

I don't remember where I got it.  It's a "barred silk", it has little skinny cross bars, in addition to the stripes.  Correction:  Mine is a ribbed silk, not barred.   The lines are white, they are just the weft.

There are similar fabrics in Revolution in Fashion 1715-1815, p.38 has the closest.  Here is a detail of the fabric in the book.  (If you haven't got this book, you need to see it!   It's terrific!)

photo

Pretty similar, hmmm?   Not perfect, but it's next to impossible to get a dead ringer in modern fabric.

My gown is almost a gown in shape, but needs its sleeves sewn on, front skirts, robings and a ton of trimming!

Monday, August 6, 2012

Bridget's Faggotting Cast On

Bridget (Ravelry link) has taught this lace cast on to me several times, and this time, it stuck! It's brilliant....it's lacey, pretty, stretchy, and has enough "oomph" to hold the edge!  It isn't flipping up, as a garter edge can.

The way it was taught to me was:
Cast on 2 sts provisionally.
Yo, p2tog turn
Repeat this row ad infinitem.
When you have the number of loops required, minus 4, it's time to pick up sts. Counting the two sts on the needle, pick up a stitch through each loop along the side of the long skinny strip. Be careful you don't twist it! When you get to the end, you should have the number required, minus 2. Pick up the two provisional sts. Done and ready! It's elegant, isn't it? Well, this constant turning made me want to poke my own eyes out....so I knit back and forth as follows.

Co 2

Yo p2tog. Do not turn
yo k2tog tbl "lefty" style as follows: k2tog tbl by inserting the left needle into the backs of the sts on the right needle. Wrap clockwise, as usual. 

 Yo p2tog. Do not turn


photo
Yo


  photo
P2tog


yo k2tog tbl "lefty" style


photo
Wrap the yarn around the left needle


photo
and k2tog tbl by inserting the left needle into the backs of the sts on the right needle. Wrap clockwise, as usual. 


 Repeat these two rows.


Picking up the stitches


photo
Here I am just putting all the loops onto the right needle.  They are large enough it's easiest for me to put them all on the needle, then knit them off, as the last step in the cast on.  The cast on isn't complete until the loops all have working yarn stitches pulled through them.  In this photo, I picked up the sts with the leading leg behind the needle, because it was easier.   I knit them off for the cast on row through the back loop.  You can pick them up with the leading leg forward, and knit them standardly, if you prefer.   Just avoid twisting them!


And here is my lace in progress, shot on location, at Santa Monica Beach, waiting for my 17yr old son's arrival there, from a coast to coast bike ride.
photo

And the Boy's arrival....happy, tired, and filthy, after 6 straight weeks of riding his bike 80-115 miles a day, with about 40 pounds of gear!
photo

Yes, I'm very proud of him, and I was so worried during this trip!  But Overland Summers did a great job running the trip, as usual.