Friday, April 2, 2010

Tattoo of the kids

There is a bit of shine, and it’s still a bit bloody in this shot (I’ve since given it the soap wash and lube, and it’s wrapped up for it’s first night, as per instructions…..
DSC01961

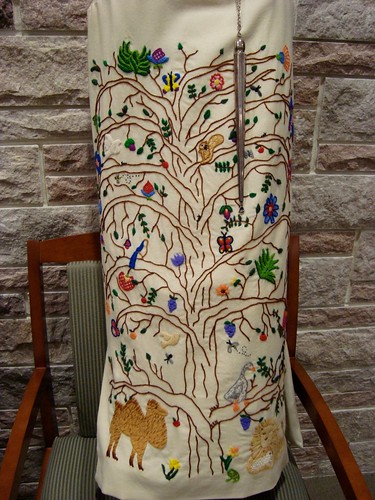
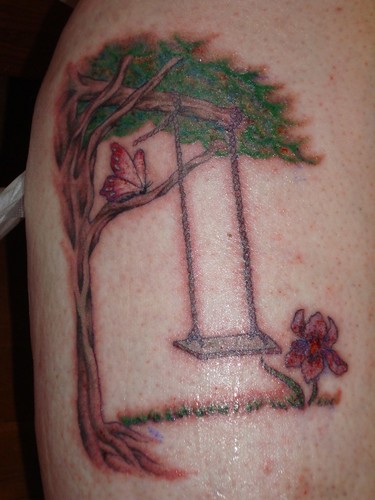
This tattoo is of my kids...Teddy is the tree, Harry the swing, Beth is the butterfly, and Wendy is the flower.

I absolutely love it. Sharon is the best!!!!! I went to Juli Moon Studios in Lynn, Massachusetts. I highly recommend them, I hope someone here goes and gives them the business, I was so pleased!

Sharon listened to me, drew up what I asked for, tweaked it based on her own taste, keeping in my the things I said (I had lots of things like “well, this or maybe that”, because I wanted the artist to be able to do what worked, without getting bogged down in what I said, since I know that what you say you want isn’t always what you would choose, when you see it for real!). We discussed placement of the butterfly, back and forth, and she ended up with it on the branch, having expected to prefer it flying. I like it there…makes the whole thing less busy and more graceful.

I was on about size and prettiness, so the tree ended up slender and graceful, in a way that it never occurred to me to request. But had I known, I would have. It’s huge, but I was expecting it to be shorter and wider, until she handed me the sketch…and taller and narrower is MUCH more elegant! She’s good…she has lovely taste. Basically, she listened to me, the whole time, and read me accurately. My dd took one look at it, and said when she gets her first tattoo, she WILL go to Sharon! And txted off a photo to her bf, because he wants a tree of life (among other things) and may prefer to go to her, too. And she gave me the whole run down on what is required on safe tattooing (you won’t get anything from her except a tattoo), and how she treats everyone as if they have something nasty, then all are safe. She has a tattoo chair that is sort of like a dentist chair, with two separate leg rests, that are adjustable, back, head rest with a hole in it, the works. Very nice and sensible. She has a water mural painted aroudn the entire room, with a mermaid and fish (some big hand painted ones, and some are colorful decals….great overall effect), the ceiling tiles are sparkly fabric colored, and there are colored glass globes hanging….it’s pretty in there. I loved it. Can you tell? Oh, and it did hurt. A lot. She was encouraging, and suggested when breaks would be good, and patiently let me take them as I needed. The forms included all the info possible, and you had to initial each, including the info that you could stop whenever you wanted to. She was picky about making sure that the stencil placement was just where I wanted it, and offered her opinion as well. We all agreed when it was right. She said she’d MUCH rather I griped AT her than about her, later!


photo-11 copy

photo-10 copy
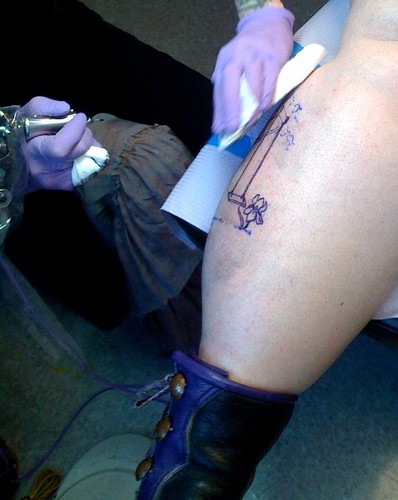
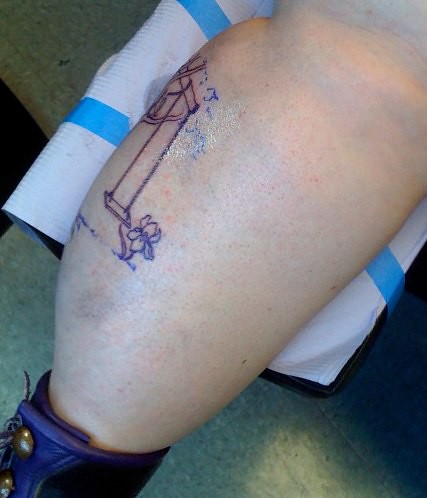
See, my leg is doing fine, here. There is no redness to speak of, yet. This part is very painful...the fine lines hurt the most!

photo-7 copy

This is the first break, this much took about 40-45 minutes. All the outline is done, the worst part!


photo-5

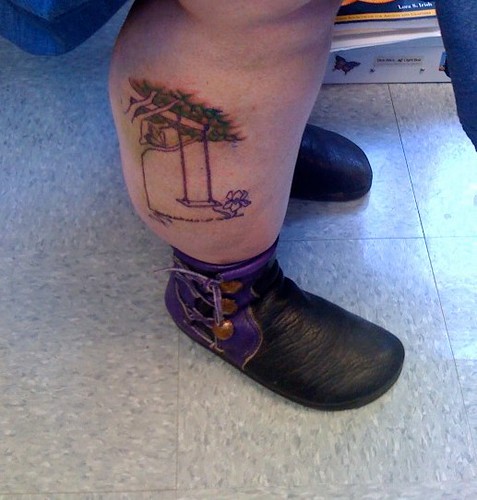
After a break...it's over half done. Some color is in.
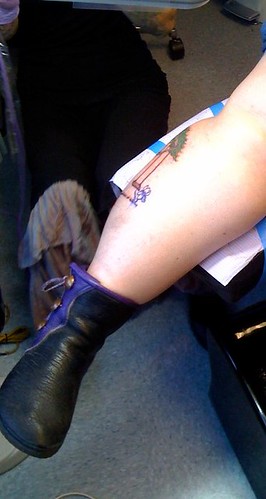
As time goes by, and more drawing/injecting of ink, my skin got pretty red!

photo-3


photo-2 copy

My skin is pretty unhappy, by now! Sharon kept putting on vaseline...she had to wipe off the blood and excess ink, over and over, and you really need the vaseline to protect your skin from those paper towels ;-) But tomorrow the redness will fade a lot, and the colors will start to really shine.
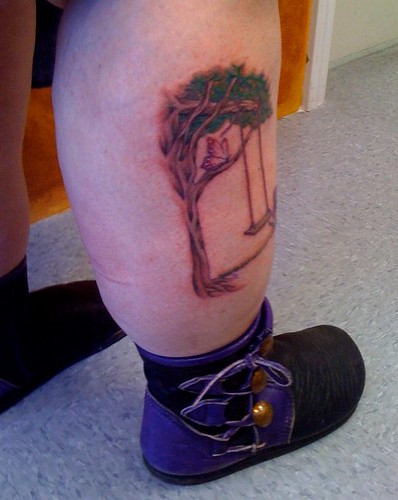
photo-1 copy


All done!

Wednesday, March 31, 2010

A square knot undoes...

DSC01958
See the square knot....right over left, left over right (or left over right, right over left...same thing).
DSC01959

Take two adjacent tails and separate them.

DSC01960
Keep pulling.....WHOOPS, you now have two half hitches sliding along a single thread.

Square knots are not good under pressure, if the tail separates from its mate!

Granny bows have this problem, too, but they are even more likely to get into this state.

If you tie a third knot on top of a square knot, or a bow, it will have less of a tendency to come apart. For baby wearing, I tied a square bow (as opposed to a granny bow), and then tied the bow loops into a double bow.

Don't trust a square knot or a granny knot whenever you are wearing something that matters (like a mai tie or wrap). Use a bow on top, or fasten the tails to their mates in some seamanlike manner that will hold (in order for the square knot to fail, the adjacent tails must separate, so there are many hitches that will hold them together, that are easy to take out on purpose, but will not fall apart easily).

Tuesday, March 30, 2010

A new tallit

I'm working on a tallit for a girl in my Synagogue, whose Bat Mitzvah is approaching. Her dad bought my tallit making services at our fundraising auction...so now it's time.

It's going to be silk ribbon flowers, on a blue silk noile atarah. I'll make the corner reinforcements blue noile, as well. There be a single flower on each corner.

DSC01954

This is the design, from Inspirations Magazine that suggested the design and the flowers to use (well, I'll change them some)

But I don't like the grid...while I played around with my cutouts, I realized that a hex set up, 6 across, worked great! These flowers need to be upright, not scattered, as is my usual pattern...but clusters work!

DSC01952

Here is half of the basic pattern, you can see it inside the drawn lines for the atarah, about 4.5 inches high, 36 inches long.

DSC01953

These are the hexes of flowers. I'm using greens for the stems, not gold, since I'm not doing the grid, and I'll change the colors of the flowers themselves....a lot!

DSC01957
This photo is a bit dark...the blue is slightly lighter, and the corals are a bit lighter and pinker as well. Well, at least that is so on my screen!

I'll transfer the pattern tomorrow! This is going to be fun...I love the colors!

Saturday, February 6, 2010

Valerie's Tallit

My niece's Bat Mitzvah went well. Her tallit was finished, pressed, and she seemed to love it...well, given the color, which she chose, that was a given!

DSC01877

Isn't she just adorable? She got the dress in blue, not pink, because the tallit was hot pink, brighter than the photo shows. Good choice!

DSC01818
And here are my older 3 kids, Val, and her brother, all in the tallitot I made for them. Not the best view of my work, but I just love the group of them! They were all delightful, too...Jamie had an aliyah alone, my 3 had an aliyah together, and Wendy chanted.

Now, on the making of the tallit...

DSC01881
I decided that Valerie's had to be the Four Mamas from the Bible, to match the four corners required for a tallit. That was easy, Sarah, Rebecca, Leah, and Rachel. No problem...but I had to find symbols for them all!

Sarah, well, she laughed when God told her that she would have a baby in her old age...so the mouth is Sarah's laughter.

Rebecca...well she favored Jacob. Encouraging sibling rivalry may be what she's famous for, but not what I wanted on the tallit! Several people (on Ravelry and in person) suggested that she was generous, that she watered the camels. Val didn't want camels (too bad...there are some gorgeous camel embroidery patterns in Australian Inspirations magazine!), so I used the blue background for the water.

Leah, Jacob's first wife, had many children, so she is the mother and child symbol.

Rachel, Jacob's beloved, was beautiful, so the eyes are for her.

The gold thread is Kreinik gold metallic thread...not as bad to work with as I was expecting. I found it easier to leave a tail when I started end ended, and use regular sewing thread to tack the tails to the stitching underneath afterwards.

The pink silk noile was a find from my friend Sharon, from one of the online fabric stores...Sharon pointed it out to me, I called Val up and sent her the link, and she was very excited by the prospect. I think it works great for her! It's loud, but it suits her. I planned to use a changeable dark greyish blue taffeta for the water, but it had a nasty crease line in both directions, that just wouldn't work. So the local quilt shop came through with this teal. It's a cotton/silk really soft, slippery blend, but when sprayed with quilter ironing sizing it behaves. Water spots it badly, but evens out once rinsed.

DSC01880

When I was tying the tzittzit, I realized that I had figured out how to do them consistently, so that the spirals started and stopped in exactly the same place, as the instructions require, but never explain how to do. The commercially tied tzittzit don't necessarily get this right, either. So, I took pictures!

DSC01804
Here are the 3 cords plus the longer shamesh.

DSC01805
The cords go through the hole, and the 7 ends get evened up, with the shamesh hanging longer. The shamesh was put through the hole to the inside, so it will always wind up on the bottom, when I'm done with each double knot (granny knot).

DSC01806
The granny knot tied, pretty straight forward so far. But this next bit is the trick: See the shamesh? It's on the bottom half. I ALWAYS "fair up" my knots so that it is in the center of the clump of threads, and pull it towards the front.


DSC01808

Now, as you pass the shamesh around to the left, then behind the stands, you can wind it the prescribed 7 times, and you end with it on top. I keep hold of the strands the whole time, to keep them neat and taught. I toss the shamesh to the left, then reach underneath to grab it and bring it back to the right and top. Divide the strands into two sections, 4 on the right, 3 on the left.

DSC01810

Add the shamesh to the group on the left, holding it towards the center of that group.

DSC01811
After that last double knot, keeping the shamesh towards the center, you start the next spirals.

DSC01812

It takes me 15-20 minutes to tie one corner of tzittzit.


Lastly, I'm not sure why, but I love this shot. You can see Beth's flowers on hers better, anyway.
DSC01824

Sunday, January 31, 2010

Heart baby slippers

I needed something quick, easy, colorful, and fun, that I could finish really fast...so, despite not having anyone I can think of with a newborn, I made these, anyway, from The SockPixie

DSC01882

They start with a modified heart, from Elizabeth Zimmermann. I made the heart hat years ago, and I liked it...so I dug out some yarn, leftovers from Jesse's Steggie (he doesn't seem to wear it much, it's adorable, though...Steggie, from Knitty.com), and added in the Fruit Loops colored yarn I couldn't resist when I bought Jessie's yarn, it's all Encore washable acrylic/nylon worsted...there is enough for a tiny sweater or two, so I'll make something to go with the booties...maybe a Feb baby sweater...

The pattern just has the booties, no closure. Since I know just how long they'll stay on baby feet, I added double strand finger looped cord, the way Jeannette, the Waldorf handwork teacher, taught us. I sewed the center back of the cord in place, so they can't get lost or tangled.

They really came out cute!

Friday, December 11, 2009

Square Sock toes

DSC01720
This sock toe is great. It's really easy, and it warps to fit any sort of foot. It can be used with most toe up sock patterns....just don't do the toe they suggest, do this one.

Figure out how many stitches you want the foot to be (look in your pattern, or do the math, whatever).

Divide that number by 4. Let's name this number....Alfred (if it is not even, just round it down, and increase those 1-3 sts in the last row).

Cast on Alfred stitches with any provisional cast on you feel like. I like the invisible cast on, here, at http://www.knittinghelp.com/videos/cast-on (scroll down), but any will do.

Work in garter stitch, knitting each row, until you have Alfred ridges on both sides (this will be Alfred times 2 number of rows).

Pick up Alfred stitches along the next side....if you have two circs, just pick up sts, one per ridge, with the needle tip with the yarn tail hanging from it. Pick one spot at the very edge of the ridge, to pick the st through, and use that same place in each ridge, to make it smooth and even. If you need to, finagle the last sts/ridge just a bit. If you are using dpns, then use a second needle to pick up these sts.

Now take out the waste yarn, putting the new, live sts from the cast on onto another circ or dpn.

Pick up sts along the last side, same as the 2nd side, onto that second circ or a 4th dpn.

Count your sts, making sure you have the required number for your pattern. Each circ should have 1/2 (twice Alfred), each dpn should have Alfred. If you had to round down to get Alfred, now increase to match your pattern and you knit the next row, and put them on your needles as the pattern requires. Continue with your pattern. This toe is a bit shallower than many short row toes, so you may need a few more rows before the ball of the foot. Most patterns measure from the tip of the toe to judge when it's time to start the heel, so changing the toe works for most patterns.

The points of the square will point up the sides, center top and center bottom of your foot.

DSC01721

Tuesday, December 8, 2009

Embroidery

It's about time I documented the embroidery I did for my synagogue, Congregation Kerem Shalom.

DSC01677

Years ago, our synagogue got a new Torah....an old new Torah. It was originally in a synagogue in Czechoslovakia. The Nazis murdered all the Jews in that town, and stole the valuables. The Torah was tattooed, cataloged, and placed in storage, to be part of a display in a museum of an extinct race. Ugh.
DSC01688
Here are the red letters the Nazis painted on the rollers. They used to be brighter, but handling has rubbed much of it off. The Torah wasn't well cared for under the Nazis, but it has had some conservation, although I wish it could have some more.

There are many Torahs like this, that were rescued and placed in synagogues for safe keeping. Here is more information.

Sixteen years ago, I was asked to make a cover for this Torah. I drew a tree of life, and embroidered it in wool on wool fabric and lined it in cotton. I kept the stitches simple, it's mostly outline stitch, with long and short stitch, satin stitch, couching, and some simple fillers.


DSC01678
I loved the camel, he was fun!

DSC01680
I really enjoyed the colors, and who could resist adding a lion and lamb to a Tree of Life? As is obvious, I had fun with the animals...when you aren't restricted by reality, you can put a goose into the tree with the seal!


DSC01692
The metal pointer is a yod, used to keep your place when chanting Torah, so that your finger oils don't damage the ink. They are usually decorative, as well as functional, and hang from the rollers, looking pretty, until the scroll is undressed, opened up and read.

DSC01689

DSC01686
Here is a page of the Torah

DSC01687
And here you can see it rolled up, ready to be dressed.

I did much of the embroidery with my then 1 yr old daughter strapped to my back! At her Bat Mitzvah, she carried this Torah around the sanctuary in the traditional processional, and then chanted from it. It's still part of Jewish life cycles, despite its history!